The hand-dyed/hand-stitched leather tote was the first item introduced to our sister company, Nikki&Mallory. It used to be the shops top seller and it's still a favorite to date.

Hand stitching is a time consuming process that requires precision, detail and countless hours depending on the size of the project. Because of that, most leather crafters/makers forfeit proper compensation for the amount of real-time hours put into larger leather pieces. But the return of compensation typically comes in the form of gratitude from customers who genuinely appreciate true quality - speaking from Nikki&Mallory's personal experiences, that's a priceless feeling.
There’s a misconception that hand-stitched items are low quality, weaker and less durable than machine-sewn pieces. Nothing could be further from the truth. In fact, hand stitching has distinct advantages, evident detailing and strength like no other.
As a self-taught leather crafter with real admiration for the art of hand-stitching, I'm always inspired to teach and learn from makers alike. Let's take a look at the process of how Nikki&Mallory makes the hand-stitched leather crossbody!
______________________________________________________
1. THE BLUEPRINT/ DRAFTING
Before creating anything, I like to research "what's in". From there I get ideas that inspire me to design the total opposite while keeping the shape/style of what's popular in mind. In a market where everyone's competing to make the same items, I enjoy going left vs. joining the crowd. From there, I design a blueprinted illustration of my prospect bag. After that, I'm confident enough to source my leather for proper use as leather IS NOT cheap.

Image: Example of Illustrated Bag. Not a Nikki&Mallory original.

2. CREATE PATTERN PIECES
Patterns are the "pieces of the puzzle". Hard stock or paper pieces that mimic every piece of your project in shape/size - and work as a guide to help you assemble. (as shown in example)

3: CUT LEATHER (USING PATTERNS)
After patterns are drafted and cut, place those pieces across your leather; making sure to use as little space possible to avoid wasting leather. Trace & Cut.
#1 Tip - using a pencil, or marking chalk is ideal for leather.
#2 Tip - cutting leather with a utility knife, leather scissors, leather cutting knife's or a rotary cutter is recommended.


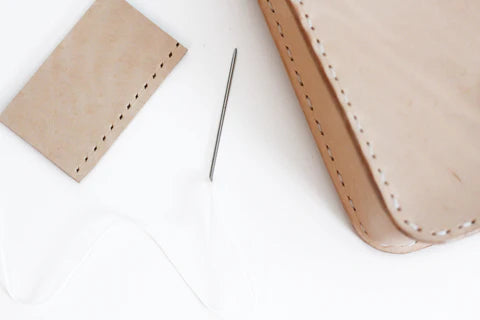
4: PREP LEATHER & ASSEMBLE
After cutting out all your leather pieces per project, depending on what type of leather you're working with, treating protects it prior to all the work and elbow grease you're about to invest. I work with a lot of vegged tanned leather which typically needs to be treated before, sometimes after being worked. "Treating" leather also refers to prepping the leather. Some require wetting, oiling and allowing to dry before assembling it. After leather has been treated, the next step is punching [holes]. Chisels are used to punch different size & shaped holes - while using the proper mallet ensures the correct pressure to apply. (Using a hammer is now recommended). Your process should mimic these steps:
1. PREP | 2. CREASE LEATHER | 3. PUNCH LEATHER


5: STITCH!
And finally, after all the preparations, you're ready to stitch and assemble. For this example I'm showing you how I stitch the crossbody. Because there are so many pieces to the crossbody, something like this might be more time consuming. None the less, the quality and end result is worth it. To watch the process from beginning to end, check Nikki&Mallory out on YouTube!